基础DOM结构
为了方便进行DOM操作,实际上是使用原生的可编辑元素contenteditable实现一个简单的富文本框。
1
2
3
4
5
6
7
8
9
10
11
12
13
14
15
16
17
18
19
20
21
22
23
24
25
26
27
28
29
30
| <script setup lang="ts">
const inputRef = shallowRef<HTMLDivElement>();
</script>
<template>
<div contenteditable class="mention-input" ref="inputRef"></div>
</template>
<style lang="scss" scoped>
.mention-input {
background-color: #f6f7fb;
width: 100%;
padding: 18px 24px;
max-height: 172px;
border-radius: 8px;
overflow-x: hidden;
font-size: 28px;
line-height: 36px;
&:focus-visible {
outline: none;
}
// 这里使用:empty选择器代替placeholder
&:empty::before {
content: "请输入评论";
color: #b1b2b6;
}
}
</style>
|
以上就得到了一个简单的可编辑元素。

监听是否输入@并替换为所需内容
添加监听器
接下来就要给这个div添加一个监听器,监听用户的键入事件,用于判断是否输入了@并显示人员选择框。这里我选择监听keyup事件(keydown同理)。
1
2
3
4
5
6
7
8
| <template>
<div
contenteditable
class="mention-input"
ref="inputRef"
@keyup="onKeyup"
></div>
</template>
|
当触发keyup事件时,所要做的就是去判断是否键入了@,以此判断是否需要显示人员选择框。为了提升用户体验,并不能简单地去判断e.code==='@',而是需要获取@对应的TextNode以及当前光标所在位置。对于这一点,请确保你知道在contenteditable的元素中输入后生成的是TextNode,也就是DOM中对应的#text元素。知道了这一点后,要做的就比较简单了。我们先定义两个ref,一个用于保存光标位置,一个用于保存@对应的TextNode。
1
2
3
4
|
const cursorIndex = ref<number>();
const textNode = ref<Selection["focusNode"]>();
|
获取光标位置和TextNode
接下来需要去获取这两个值。这里用到了window.getSelection(),官方文档对于该API的描述如下:
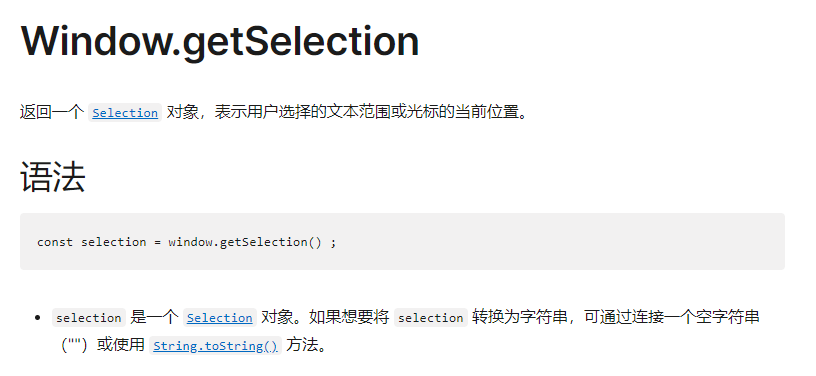
兼容性还是不错的。

获取对应光标位置和TextNode的代码如下:
1
2
3
4
5
6
7
| function setCursorIndex() {
cursorIndex.value = window.getSelection()?.focusOffset;
}
function setTextNode() {
textNode.value = window.getSelection()?.focusNode;
}
|
判断是不是@
接下来就需要用TextNode去判断是不是@。
1
2
3
4
5
6
7
8
9
10
11
12
|
function isAt() {
if (!textNode.value || textNode.value?.nodeType !== Node.TEXT_NODE)
return false;
const content = textNode.value.textContent ?? "";
const match = /@$/.exec(content.slice(0, cursorIndex.value));
return match && match.length === 1;
}
|
Keyup监听器的具体逻辑
我这里用了vueuse,直接用ref肯定也是可以的。注意这里是移动端,用的是Vant的popup组件,具体逻辑自己实现。
1
2
3
4
5
6
7
8
9
10
11
12
13
14
15
16
17
18
19
20
21
22
23
24
25
26
27
28
29
30
31
32
33
34
35
36
| <script setup lang="ts">
import { useToggle } from "@vueuse/core";
// 是否显示选择用户弹窗
const [showSelectUser, setShowSelectUser] = useToggle();
function onKeyup(e: KeyboardEvent) {
setTextNode();
setCursorIndex();
// 判断是否在用键盘移动光标
if (
e.code === "ArrowUp" ||
e.code === "ArrowDown" ||
e.code === "ArrowLeft" ||
e.code === "ArrowRight"
) {
return;
}
// 判断是否键入@
if (!isAt() || e.code === "Backspace" || e.code === "Delete") {
return;
}
// 显示选择用户弹窗
setShowSelectUser(true);
}
</script>
<template>
<div
contenteditable
class="mention-input"
ref="inputRef"
@keyup="onKeyup"
></div>
<UserSelect v-model:show="showSelectUser" @confirm="handleUserSelect" />
</template>
|
替换@节点逻辑
在上一个小节中,我们从UserSelect组件获取到了选中的用户列表,并通过confirm事件返回给父组件。接下来要实现的就是handleUserSelect这个方法,替换@节点。具体实现如下:
1
2
3
4
5
6
7
8
9
10
11
12
13
14
15
16
17
18
19
20
21
22
23
24
25
26
27
28
29
30
31
32
33
34
35
36
37
38
39
40
41
42
43
44
45
46
47
48
49
50
51
52
53
54
55
|
function handleUserSelect(userList: any[]) {
inputRef.value?.focus();
if (!userList.length || !textNode.value) return;
const content = textNode.value!.textContent ?? "";
const parentNode = textNode.value.parentNode;
const nextNode = textNode.value.nextSibling;
const preSlice = content.slice(0, cursorIndex.value).replace(/@$/, "");
const restSlice = content.slice(cursorIndex.value);
const prevTextNode = new Text(preSlice.slice(0, preSlice.length - 1));
const nextTextNode = new Text(restSlice);
const mentionEl = userList.map((user) => createMentionElement(user));
mentionEl.forEach((el) => {
if (nextNode) {
parentNode?.insertBefore(prevTextNode, nextNode);
parentNode?.insertBefore(el, nextNode);
parentNode?.insertBefore(nextTextNode, nextNode);
} else {
parentNode?.appendChild(prevTextNode);
parentNode?.appendChild(el);
parentNode?.appendChild(nextTextNode);
}
});
parentNode?.removeChild(textNode.value);
const range = new Range();
const selection = window.getSelection();
range.setStart(nextTextNode, 0);
range.setEnd(nextTextNode, 0);
selection?.removeAllRanges();
selection?.addRange(range);
setTextNode();
parentNode?.removeChild(textNode.value);
}
|
注意:这里就是需要移除两次TextNode,因为在多选情况下会生成多个TextNode。
创建mention元素
上一节中我们实现了替换@节点,这一节展示如何创建用于替换@节点的元素,即代码中的createMentionElement方法。
1
2
3
4
5
6
7
8
9
10
11
12
13
14
15
16
17
18
19
20
21
22
23
24
25
26
27
28
29
30
31
| function createMentionElement(user: any) {
const el = document.createElement("span");
el.style.display = "inline-block";
el.dataset.userId = user ? user.id : "";
el.className = "mention-node";
el.textContent = user ? user.username : "";
const spaceEl = document.createElement("span");
spaceEl.style.whiteSpace = "pre";
spaceEl.textContent = "@\u200b";
const spaceElAfter = document.createElement("span");
spaceElAfter.style.whiteSpace = "pre";
spaceElAfter.textContent = "\u200b ";
const wrapper = document.createElement("span");
wrapper.appendChild(spaceEl);
wrapper.appendChild(el);
wrapper.appendChild(spaceElAfter);
return wrapper;
}
|

到了这里我们的@功能已经实现了,之后只需要实现获取文本框内容逻辑,实现的是业务所需的逻辑,仅供参考。
获取文本框内容(参考)
1
2
3
4
5
6
7
8
9
10
11
12
13
14
15
16
17
18
19
20
21
22
23
24
| function getContent() {
const content = inputRef.value?.textContent ?? "";
const userIdList: string[] = [];
document.querySelectorAll(".mention-node").forEach((item) => {
userIdList.push(item.getAttribute("data-user-id") ?? "");
});
return {
content: content.replaceAll("\u200b", "#"),
userIdList: userIdList.filter(Boolean),
};
}
function clear() {
inputRef.value!.textContent = "";
}
defineExpose({
getContent,
clear,
});
|
在列表中替换展示@节点(参考)
main.ts
1
2
3
4
5
6
| import VueDompurifyHtml from "vue-dompurify-html";
const app = createApp(App);
app.use(VueDompurifyHtml);
|
bubble.vue
1
2
3
4
5
6
7
8
9
10
11
12
13
14
15
16
17
18
19
20
| <script setup lang="ts">
// 替换@为特殊样式
function handleContent(content: string) {
return content.replaceAll(/@#.+#/g, (item) => {
return `<span class="mention">${item.replaceAll("#", "")} </span>`;
});
}
</script>
<template>
<div class="content" v-dompurify-html="handleContent(content)"></div>
</template>
<style lang="scss" scoped>
...
:deep(.mention) {
color: var(--van-primary-color);
}
...
</style>
|